Rfreeman
Well-known member
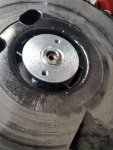
Trying to swap a motor on one of my hoppers and having a hard time removing this piece (sorry don't know the specific part name)
I removed the 3/32nd Allen set screw now I'm trying to remove this piece to get to the 2 Phillips screws behind it which I believe are still holding the motor in place
Using a flat head screw driving I can get it to run forward just can't get it all the way off.
I removed the 3/32nd Allen set screw now I'm trying to remove this piece to get to the 2 Phillips screws behind it which I believe are still holding the motor in place
Using a flat head screw driving I can get it to run forward just can't get it all the way off.