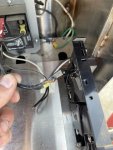
I’ve got a vacuum that’s staying on and not shutting off. Anybody have any ideas? It’s a JE Adam’s 9213. I opened it up and found a wire that appears to be burnt. Everything else looks normal. As soon as I flip the breaker back on it starts running.
Car Wash Forum
You are using an out of date browser. It may not display this or other websites correctly.
You should upgrade or use an alternative browser.
You should upgrade or use an alternative browser.
Vacuum staying on
- Thread starter Noob
- Start date

MEP001
Well-known member
You can replace the relay module in those timers, but I haven't been able to find it at a reasonable price.
Adams doesn't do a very good job crimping the spades. That's why the wires burn. I usually rewire them with a 12 gauge going to the motors and really crush the hell out of the crimp. I feel like the 10 gauge just doesn't give enough to make a solid crimp connection.
Adams doesn't do a very good job crimping the spades. That's why the wires burn. I usually rewire them with a 12 gauge going to the motors and really crush the hell out of the crimp. I feel like the 10 gauge just doesn't give enough to make a solid crimp connection.


It looks to me like you've got a bad timer. The reason it burned is there's to much load on the wire. If you install a mercury relay between the timer and the motors and have the timer control the mercury relay you wouldn't have this problem. The only load on the timer would be the coil of the relay, which is just about nothing. https://www.mdius.com/products/mercury-relay-35-amp-single-pole-120-vac-coil-normally-open-t-top we've been using these for well over 30 years, never had one fail. You can get them at kleen-rite
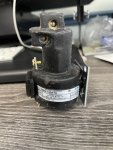
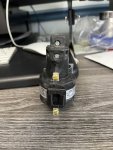

The top terminal is your incoming power or line voltage, the next one down is the load, it goes to your vacuum. The 2 brass screw terminals are for the coil, connect the timed load from the timer to one of the terminals and common to the other. It's that simple. The relay has to be mounted straight up and down, just like you have it in your picture. Be sure to replace any wire that is questionable or burned.
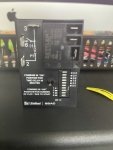
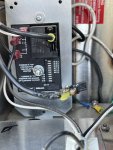
That looks like it's a cap over the terminal. The timer looks to be correctOne more questions guys. I ordered a replacement timer from KR and I’m thinking they sent me the wrong timer. The old timers look have something that looks like a bulb in the top right. The new one does not have that.
One last questions guys. Forgive me I don't have a lot of experience with electrical work. I just want to make sure I'm correct before I wire it up. Is my placement of the mercury terminal wiring correct? Also can someone tel me which 18ga black wire is the timed load?

Last edited:

MEP001
Well-known member
The two terminals on the right are input and load. You can use either one. Main power goes to one, load to the relay comes out the other. In your first diagram, the very top "10GA BLACK" on the barrier strip is the timed load out. See how it goes to the fuses and then the motors.
When you get all done the timer will only control the coil on the relay, the coil only draws about 55 mA so the timer should last a lot longer. Think of the relay as a switch, you put power to the relay coil the coil energizes relay. The Load terminals are designed to take a 6-14 AWG wire. I connect the wires from the vac motors together and then connect the single #10 wire to the relay.

