What's new
Car Wash Forum

This is a sample guest message. Register a free account today to become a member! Once signed in, you'll be able to participate on this site by adding your own topics and posts, as well as connect with other members through your own private inbox!

Lock bolt replacement on Hamilton ACW4?????

spf8298

Member
Is there a special tool to replace the lock bolt on a Hamilton ACW4 auto cashier? My bottom bolt is stripped out. I have the replacement bolt (Kleenrite Part 90-0275), but I can't get a wrench in there to free up the mechanism to get the bolt out. Maybe I'm just slow..... Any help is appreciated.

Shaun
 
Assuming you have the door open….pretty easy. If door is closed and you can’t open…I guess drilling.
FYI……THE ACW machine has been in “end of life” status for over a year. There are no (new) parts or support offered by Hamilton….might be time to replace….before it shuts you down.
 
Assuming you have the door open….pretty easy. If door is closed and you can’t open…I guess drilling.
FYI……THE ACW machine has been in “end of life” status for over a year. There are no (new) parts or support offered by Hamilton….might be time to replace….before it shuts you down.
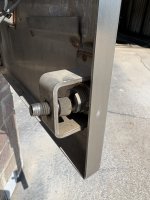
I have the door open. I don’t see how you spin the nut off so you can slide the bolt out. Am I missing something?

I know the ACW4 is on its way out. But I run a small car wash in a town of 2000 people and I’m gonna milk this thing as long as I can get it.
 
I have the door open. I don’t see how you spin the nut off so you can slide the bolt out. Am I missing something?

I know the ACW4 is on its way out. But I run a small car wash in a town of 2000 people and I’m gonna milk this thing as long as I can get it.
I have the door open. I don’t see how you spin the nut off so you can slide the bolt out. Am I missing something?

I know the ACW4 is on its way out. But I run a small car wash in a town of 2000 people and I’m gonna milk this thing as long as I can get it.
IMG_2131.jpeg
 
Step-by-Step Replacement Instructions

1. Power Down the Unit
  • Turn off the main power switch inside the machine, followed by the main breaker feeding the autocashier.
  • Safety Note: The door must remain fully open during this process. Do not remove the machine's anchor bolts while doing this work, as the open vault door makes the cabinet top-heavy and prone to tipping.[1]

2. Remove the Inner Door Cover Panel
  • Look at the reverse (inside) face of the open vault door.
  • Use a Phillips head screwdriver to remove the screws securing the metal inner skin or controller cover panel.
  • Carefully set the panel and screws aside to expose the lock rods, throw-bars, and deadbolt linkage. [1, 2]

3. Loosen the Locking Bolt Retaining Fasteners
  • Trace the mechanical linkage from the exterior T-handle or key-cylinder to the edge where the locking bolt extends.
  • Locate the specific set screw or retaining pin holding the locking bolt to the internal linkage assembly.
  • Using your flathead screwdriver or Allen key, loosen the set screw. Do not back it out completely—just loosen it enough so that the bolt can free itself from the guide track. [1, 2, 3, 4]

4. Extract the Old Locking Bolt
  • Manually actuate the door handle slightly if needed to align the bolt with its release notch.
  • Pull or slide the old, damaged locking bolt out from its housing track. If it is stuck due to corrosion or physical damage, gently tap it with a screwdriver handle to free it. [1, 2, 3]

5. Install the New Bolt & Reassemble
  • Slide the new Hamilton 90-0275 Lock Bolt into the slot, making sure it aligns perfectly with the throw-arm linkage.
  • Tighten the set screw firmly back down into the alignment groove on the bolt.
  • Test the mechanism mechanically while the vault door is still wide open. Insert your key, turn the handle, and ensure the bolt extends and retracts smoothly without binding.
  • Reinstall the inner door cover panel and power the autocashier back up. [1, 2, 3, 4, 5, 6]


If your internal mechanism or locking cylinder is seized completely, you can cross-reference the schematics found in the Hamilton ACW-4 Manual, or contact the Hamilton Manufacturing Support Department for direct technical assistance. [1, 2]
 
Look for a nut holding the lock housing in place…remove that and housing to allow bolt to come out.

I suggest you be on lookout for a replacement cashier (maybe used gold line) or line up spare used parts. That machine is one power surge away from shutting you down
 
Look for a nut holding the lock housing in place…remove that and housing to allow bolt to come out.

I suggest you be on lookout for a replacement cashier (maybe used gold line) or line up spare used parts. That machine is one power surge away from shutting you down
Thanks for the info
 
Look for a nut holding the lock housing in place…remove that and housing to allow bolt to come out.

I suggest you be on lookout for a replacement cashier (maybe used gold line) or line up spare used parts. That machine is one power surge away from shutting you down
Look for a nut holding the lock housing in place…remove that and housing to allow bolt to come out.

I suggest you be on lookout for a replacement cashier (maybe used gold line) or line up spare used parts. That machine is one power surge away from shutting you down
I think your instructions are for a different machine. There is no removable interior panel on my ACW4. It is also nearly impossible to remove the nut that holds the lock housing in place without some sort of special tool. I'll contact Hamilton direct.
 
Take a hammer drill with a small chisel tip to one edge of the nut and hit it with hammer only function. I guarantee it will back right off to where you can spin it by hand.

Not sure why the manufacturer welded the brackets to the door.
 
Step-by-Step Replacement Instructions

1. Power Down the Unit
  • Turn off the main power switch inside the machine, followed by the main breaker feeding the autocashier.
  • Safety Note: The door must remain fully open during this process. Do not remove the machine's anchor bolts while doing this work, as the open vault door makes the cabinet top-heavy and prone to tipping.[1]

2. Remove the Inner Door Cover Panel
  • Look at the reverse (inside) face of the open vault door.
  • Use a Phillips head screwdriver to remove the screws securing the metal inner skin or controller cover panel.
  • Carefully set the panel and screws aside to expose the lock rods, throw-bars, and deadbolt linkage. [1, 2]

3. Loosen the Locking Bolt Retaining Fasteners
  • Trace the mechanical linkage from the exterior T-handle or key-cylinder to the edge where the locking bolt extends.
  • Locate the specific set screw or retaining pin holding the locking bolt to the internal linkage assembly.
  • Using your flathead screwdriver or Allen key, loosen the set screw. Do not back it out completely—just loosen it enough so that the bolt can free itself from the guide track. [1, 2, 3, 4]

4. Extract the Old Locking Bolt
  • Manually actuate the door handle slightly if needed to align the bolt with its release notch.
  • Pull or slide the old, damaged locking bolt out from its housing track. If it is stuck due to corrosion or physical damage, gently tap it with a screwdriver handle to free it. [1, 2, 3]

5. Install the New Bolt & Reassemble
  • Slide the new Hamilton 90-0275 Lock Bolt into the slot, making sure it aligns perfectly with the throw-arm linkage.
  • Tighten the set screw firmly back down into the alignment groove on the bolt.
  • Test the mechanism mechanically while the vault door is still wide open. Insert your key, turn the handle, and ensure the bolt extends and retracts smoothly without binding.
  • Reinstall the inner door cover panel and power the autocashier back up. [1, 2, 3, 4, 5, 6]


If your internal mechanism or locking cylinder is seized completely, you can cross-reference the schematics found in the Hamilton ACW-4 Manual, or contact the Hamilton Manufacturing Support Department for direct technical assistance. [1, 2]

This is why AI can't turn a wrench.
 
Just a hammer and a small center punch will loosen the nut. I've removed a hundred of them. I also have a wrench and bolts with a different style head, so the crooks won't have the right tool if they get past your locks.
 
Just a hammer and a small center punch will loosen the nut. I've removed a hundred of them. I also have a wrench and bolts with a different style head, so the crooks won't have the right tool if they get past your locks.
What size hammer? I use a 3lb sledge and a long center punch, just make sure your tapping it in the right direction. You might as well replace the nut on the inter strut at the same time you replace the bolt. I've only done before, but I stayed at a Holiday Inn last night.
 
Back
Top